How Do You Add Your Files For Our API?
If you are new to navigating around Amazon's AWS3 cloud storage, let's start with you signing into your console. You will want to navigate to the storage section of their AWS Management Console section, and select S3. You should be at your home base now for storage. We recommend bookmarking this for easy access later.
Amazon's AWS3 storage option is great for the organization and storage of your artwork used for your orders. Allowing you to set up a file hierarchy in a manner that best suits your needs.
Artwork Hierarchy and Organization
Organization Prep of Buckets and Folders
One important thing to note about AWS3 structure is that your main categories will be called buckets instead of folders. Within those buckets you will be able to create folders for more organization if needed.
It is important to note that each file will have a unique web link, so keep in mind that changing your structure later will result in you having to update where ever you have used those links. It is worth taking the time to structure it in a way that is static and easy for your usage, with growth in mind.
Depending on what you are selling, how you set up your hierarchy will vary. In the end, it is up to you as you will be the one that needs to locate and access your files with ease. Below is just a suggestion based on our experience when dealing with a lot of art files.
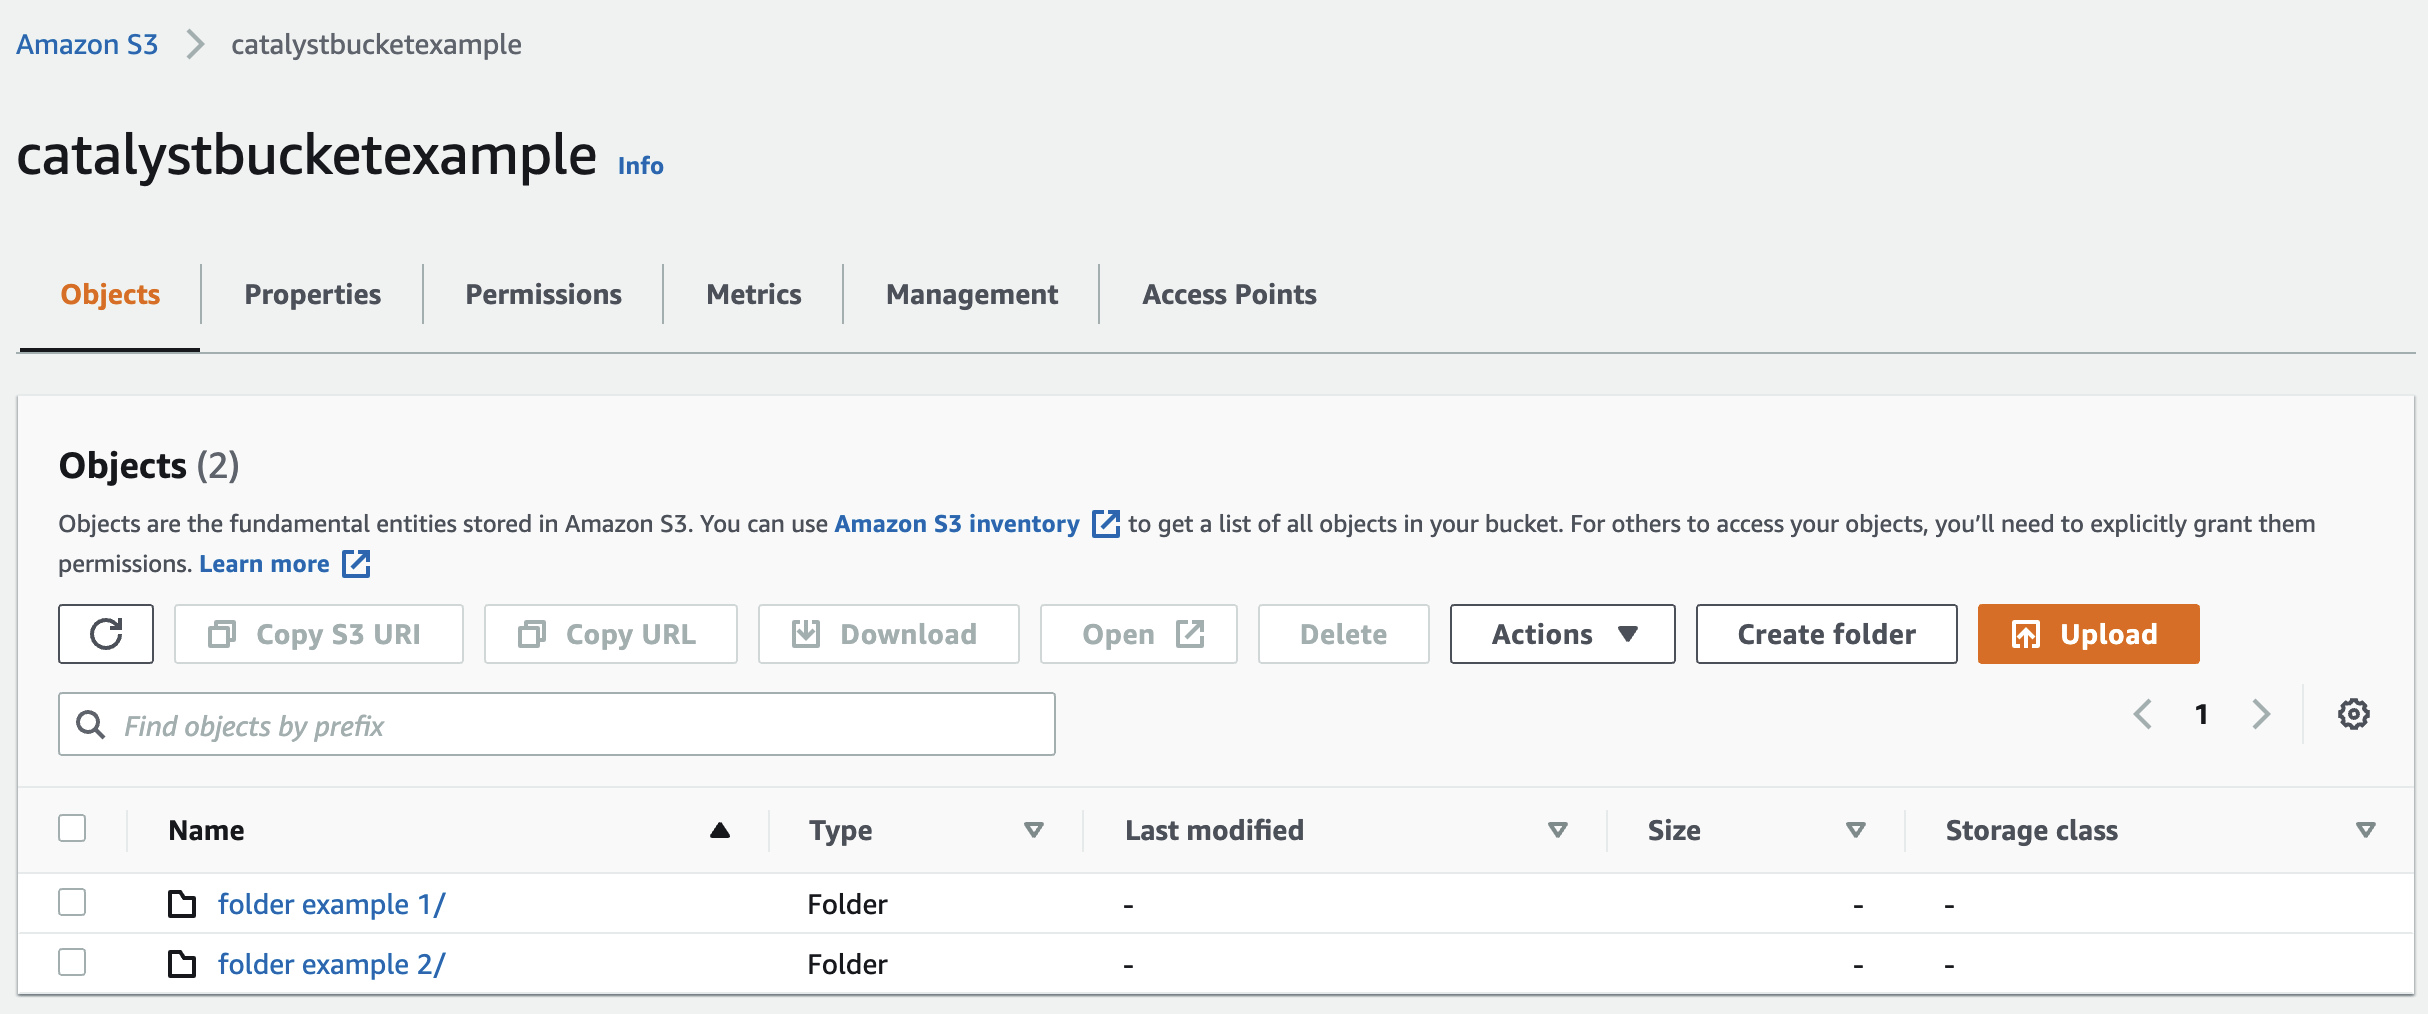
Artwork Hierarchy Example
In this example, we will take one of our biggest sellers the pillows. Pillows have multiple sizes and types, we can remove type as a factor since a 16" pillow for example will be the same art size for all pillow types.
We would have a bucket labeled pillows, AWS3 can be tricky with naming so play around with what works for you. Once we have made our bucket, we will then create the subfolder for each size carried. Easy. Done. Organized.
You've figured out your hierarchy and are ready to go. That is great, but we need to talk about permissions. Permissions are an important speed bump for both buckets and artwork files. If not set correctly, your artwork can't be accessed or printed.
Permissions and Allowing API Access
Bucket Permissions
When you select to create a new bucket, you will have a page of options including naming your bucket. Before you select the Create Bucket button, you will need to address two permissions options.
1. Switch the default option from ACLs disabled, to ACLs enabled. Then select the Object Writer option. This is so you can make your files public, otherwise, step 2 will not be relevant and you will not be allowed to set your file permissions as needed.
2. Scroll down a little to the "Block all Public Access" box, and uncheck it. This will prompt a warning right below to show up, asking you to confirm if you are sure you want to do this. Yes you do, so go ahead and check the acknowledgment button. All additional settings after that are up to you. If you fail to do this step, it will also prevent you from setting your file permissions as needed.
You may now create your bucket.
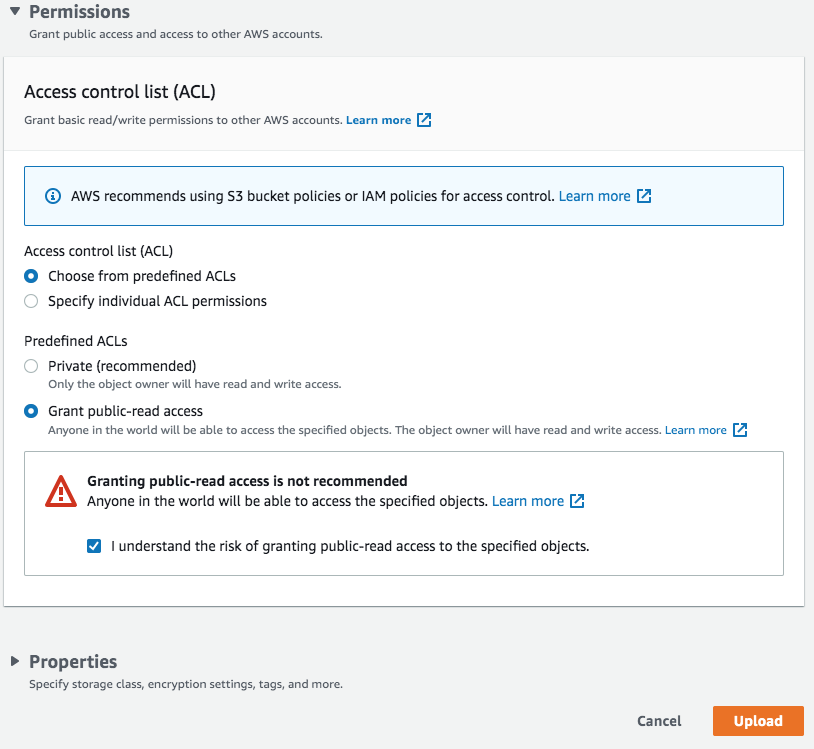
File Permissions
Here is the basic concept of what you may see for setting up permissions. They do change how this looks from time to time, but the permissions are the same.
Now whether you are putting your files in folders or directly into your bucket doesn't matter for this step, as it will be the same no matter where these files go. So let's start with you going to where you wish to upload your first set of files.
You can just drag and drop them for ease, either one by one or a stack of them at once. You can only bulk upload up to 10 images at a time though. Once you have dragged over your file(s), check your list to make sure they are the right files.
Scroll down to the Permissions option, and expand it. You will want to select the "Grant Public-read Access" option. This will prompt a warning right below to show up to confirm you are sure you want to do this. Yes you do, so go ahead and check the acknowledgment button. All additional settings after that are up to you.
You can now select the Upload button. Almost done!
You can always access the permissions again for your buckets and files if you need to change something. Simply go to the file or bucket in question, and select the permissions tab.
Art File Links and What To Do With Them
Grabbing the Art File Link
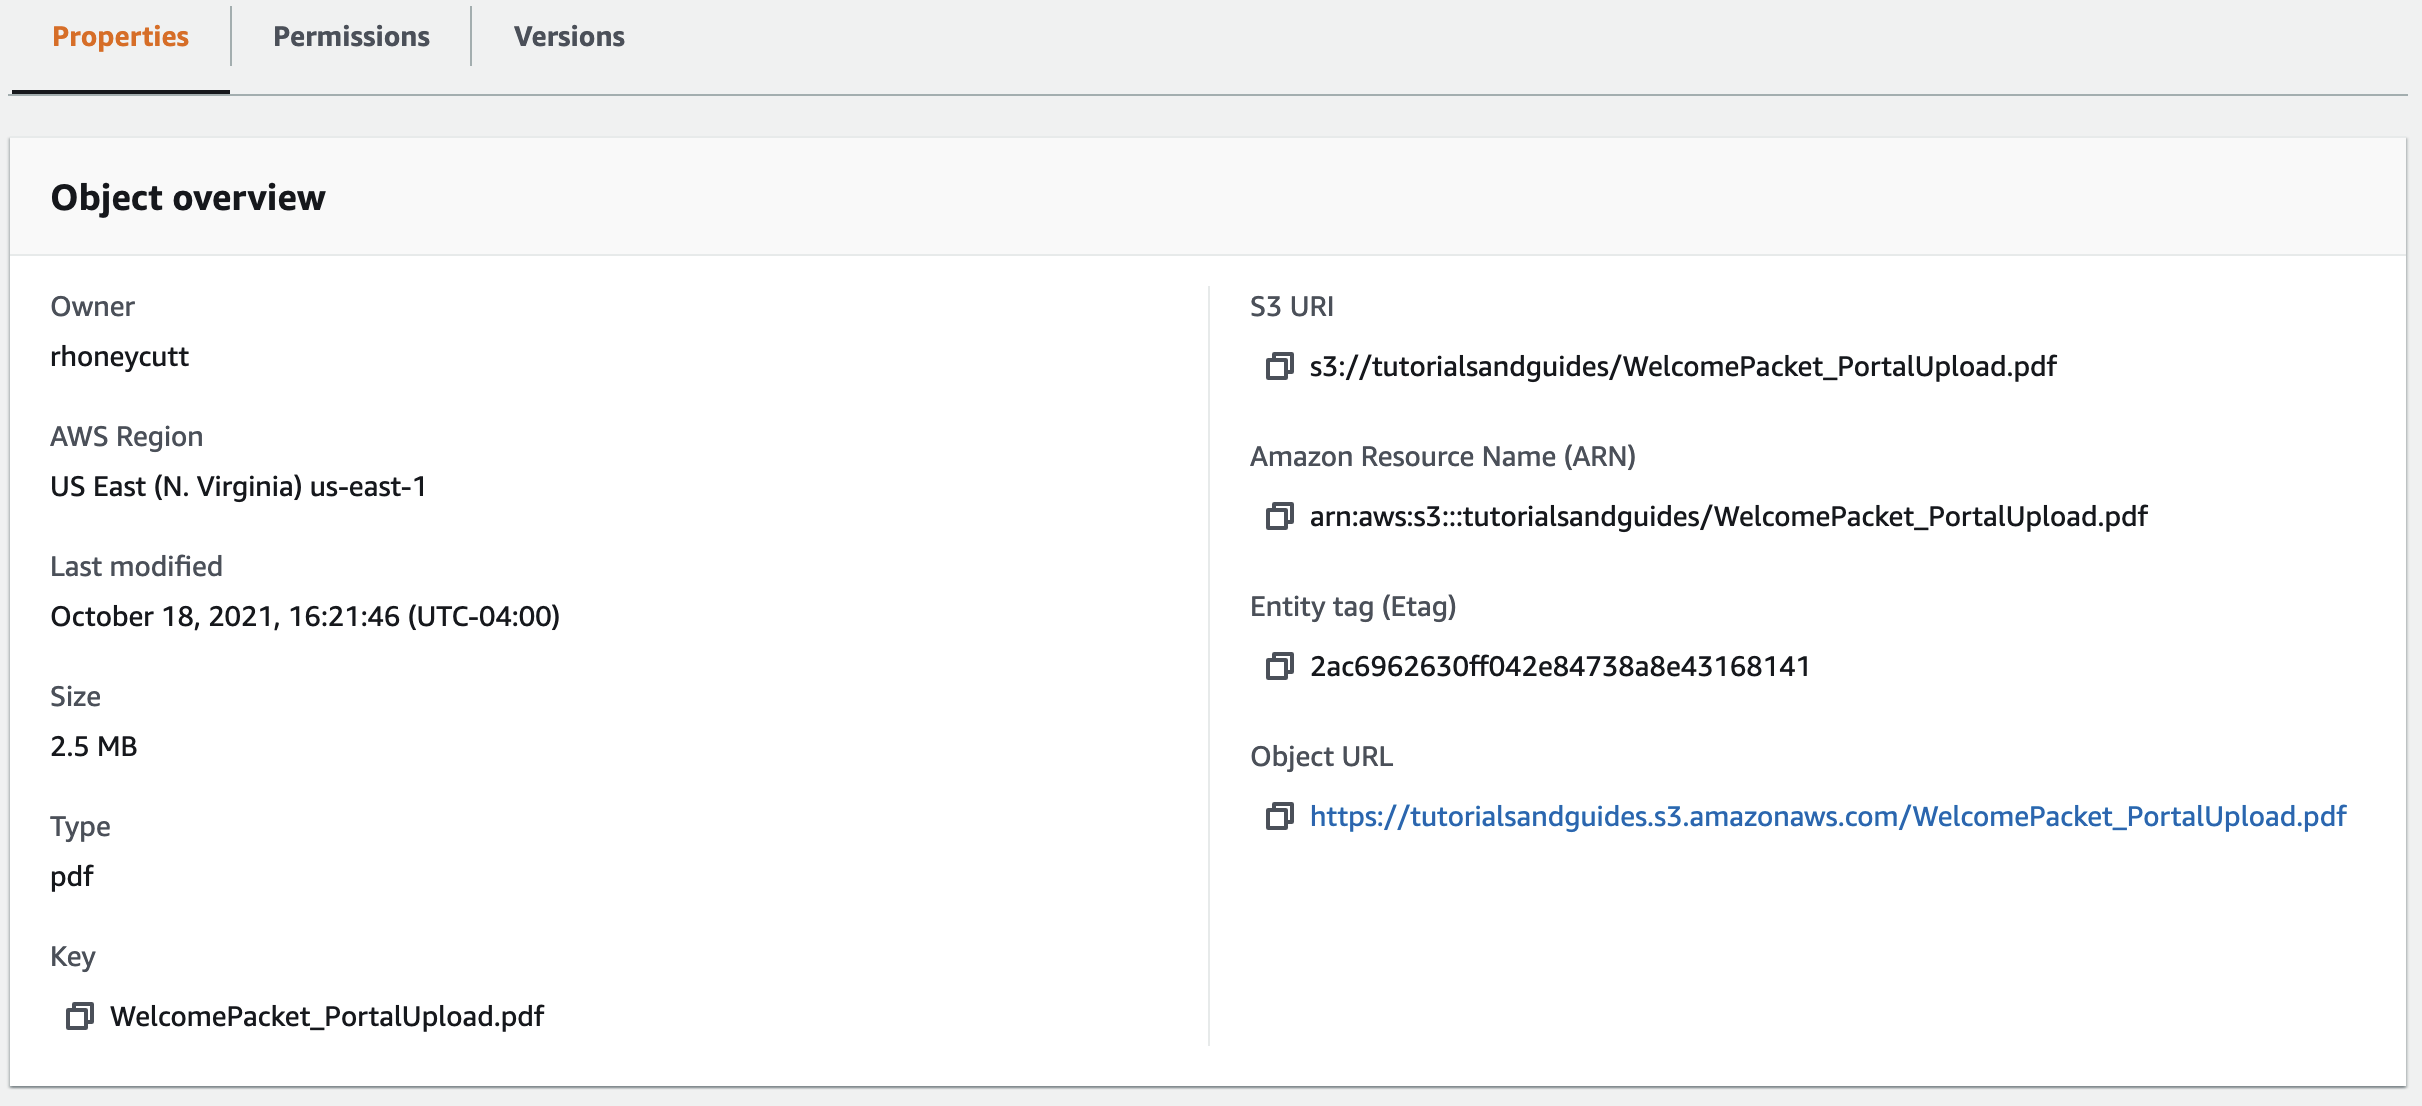
Once your files have finished uploading successfully, you will have an overview page of each file that has been uploaded. These will appear as links, and when selecting one it will open the art file information on a new tab.
In the Object overview section, you will see on the lower right-hand corner your Object Url. This is the link you will want to copy and paste where you need to use it for your orders. If you need this link again or want to do this step another time, you will be able to get it by going to the art file again within your bucket.
Creating an Art File Link List
If your art files links are something that you will need to access on a recurring basis, we highly recommend creating a master spreadsheet with all of your links added to it. That way you can grab them easily from one place, instead of going back to the individual files each and every time.
Save yourself a lot of steps, time, and clicking with this idea. If you don't have an easy method of doing this, we recommend using google sheets. We utilize this tool for a lot of our work, and love the ease it brings, but feel free to use whatever works best for you.
At first this seems like a lot of steps, but after the initial set up most of your work is done. Aside from uploading new files or updating them, things are pretty much static from here on.